There are several ways to polish your writing before it undergoes editorial intervention. When working in Microsoft Word, these five easy steps will swiftly improve your text and prepare it for editing: choosing the text language, using spellcheck and headings hierarchy, cueing in the images, using find (and replace) and creating a style sheet. Following these steps will enhance your text, save time (and money) on editing and typesetting and improve the readability and publishability of your text.
After reading this blog post, you will be able to apply them to your text without particularly savvy computer skills or knowledge of the editorial practice. They can help writers who are self-publishers, work with professional publishing houses or do not want their text to be publicly available. In the end, various levels of editing and proofreading are essential and unavoidable steps in finalising the manuscript, whatever your intended publishing path.
1. Choose the text language and use spellcheck
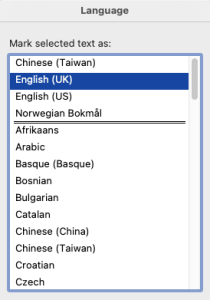 Select the language of your text and use the spellcheck. It may sound obvious, but many writers omit this basic step. Out of the array of editorial software available on the market, Word’s inbuilt text editor is one of the most accessible and fundamental tools at your disposal, so remember to make full use of it. Click Language (which you will find under the Review tab) and select the language of your text. Check Microsoft Support’s page for more detailed instructions. This step maximises the capability of spellcheck to catch all spots that require attention.
2. Use a clear styling hierarchy
Have you ever ended up with several styles in your manuscript, making it look cluttered and disorganised? There is a straightforward trick to apply when starting a new document that helps keep your work looking clean and tidy.
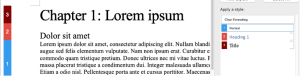 Choose descending levels of font sizes and different font styles to indicate the rank of chapter titles, headings and subheadings and make them distinguishable. There are other benefits of utilising this Word function beyond just highlighting your manuscript’s logical flow:
- It will help you automate the creation of the table of contents.
- The hierarchy and structure of the text will be understandable to other stakeholders involved with your text, such as the typesetter, editor and proofreader, and it will let them work more efficiently. (You can read more about creating or customising styles on Microsoft’s support page).
3. Cue in the images and tables
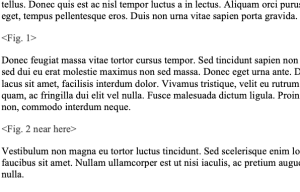 Cues are short references to images that communicate to the typesetter where they should be placed in relation to the text. They typically include angle brackets and text inside: type of figure and number, for instance, <Table 3>. In other words, they mark the ideal position in the text of each illustration or table by cueing it in. Usually, they are placed directly after the paragraph in which the image is first mentioned. By cueing in the images and tables in the text, you communicate with the typesetter, making their work more straightforward.
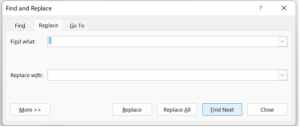
4. Find (and replace)
Find (and replace) works especially well with those minute details that are difficult to catch for the naked eye, such as double space. The program highlights the desired elements, and you can decide whether to replace all of them in one click or review each case individually. It can help to eliminate, for instance, repetitions or unwanted spaces before punctuation marks. You can also read Microsoft’s support page discussing find and replace. You will find it under the Edit dropdown. When I was writing my PhD thesis, this used to be my favourite Word tool, and on my Word for Mac, it looks like this:

In a Windows version, it may look like this:
5. Create a style sheet
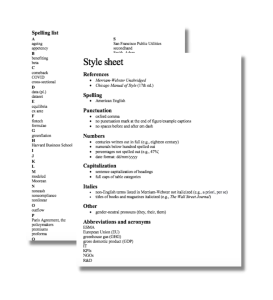 Create a style sheet and record your language and styling decisions. In short, record all decisions concerning language you make while writing, such as spelling, punctuation and capitalisation, to ensure a consistent style throughout the manuscript. Admittedly, this step is probably more of a time commitment compared to the other tricks to polish your writing. Still, it is easy, does not require any tech skills and will yield many benefits to your text. For instance, a style sheet is usually created during copyediting, so why not save the time (and money) an editor would spend working on it? Equally, it will speed up the proofreading of your text.
I have previously written about how and why your manuscript will benefit from having a style sheet and created a free style sheet template that you can use for your next writing project.
Other ways to polish your writing
If you prefer to approach polishing your writing more systematically, I recommend getting to know macros. For those unfamiliar with macros, they allow speeding up or automating certain sequences of commands in Microsoft Word. With one click, macros save you time manually performing these actions. You can create your own, but I recommend starting with those written by editors. For instance, have a look at Paul Beverley’s editorial macros available for free or this fact sheet, Getting started with macros, created by the Chartered Institute of Editing and Proofreading.
In addition to editing and proofreading your own work, another way to polish your writing is to use professional copyediting and proofreading services. This is particularly useful for those who need more confidence in their own editing abilities or have a critical piece of writing that needs to be flawless. Professional editors can catch grammar, spelling, and punctuation errors and suggest improvements for sentence structure and clarity. They can also help ensure tone, style, and formatting consistency throughout the document. Although this service usually comes at a cost, it can be worth the investment to present your writing in the best possible light.
Final thoughts
In conclusion, these five easy tricks are a great way to improve your text’s overall quality, readability and publishability. Remember to select the language of your text and use the spellcheck, apply a clear styling hierarchy, cue in the images and tables, use the find (and replace) function and create a style sheet. By following these steps, you can save time and money on editing and typesetting. Furthermore, it will ensure that your text is well-organised, consistent and easy to read. Particularly in the case of large-volume projects, these steps may save time and make your text look more consistent and refined. Your editor and typesetter will thank you, too.
While these tricks can help improve your writing, they cannot replace professional copyediting and proofreading services. For instance, an objective and experienced editor’s review of your work may help catch any errors or inconsistencies. For more editing tips for writers, follow me on Mastodon, Twitter and LinkedIn, sign up for my newsletter or contact me for a free sample edit (and remember to use my early bird discount).